Advanced Character Creation
Master Edit and Reference to create poses, outfits, and new characters that stay consistent.
Overview
Once you've created a character you like, SpriteCook's Edit and Reference features let you expand on that foundation. Edit modifies your existing image directly, perfect for poses and outfit changes. Reference uses your image as a style guide to create entirely new characters that match.
This guide continues with the cyberpunk protagonist from our sprite generation guide. We'll show you how to build out a full character set using these tools.
Finding the Buttons
Every image in your library shows action buttons when you hover over it. Here's what each button does:
Use as Reference
Creates new images in the same art style. Use this to make different characters that match.
Edit Image
Modifies the image directly. Use this for poses, outfits, colors, or adding/removing details.
Use Settings
Copies this image's generation settings to your prompt. Useful for recreating similar results.
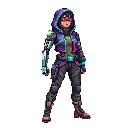
Your Starting Point
We'll use this character as our base: the female protagonist with a chromed left arm from the creation guide.
Our base character: cyberpunk protagonist with chromed left arm
Creating Different Poses with Edit
Edit is ideal when you want to change a character's pose while keeping their appearance intact. The AI understands the character's features and repositions them based on your prompt.
How to create a new pose:
Click the highlighted "Edit" button
Click "Edit" on your base character
Describe the pose you want: "character in fighting stance, fists raised"
Generate and compare with the original
Example: Action poses

Idle pose
"standing relaxed, arms at sides"
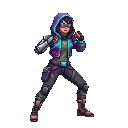
Action pose
"character in fighting stance, fists raised"
Tip: Mention distinctive features in your edit prompt (like "chrome arm") to help the AI preserve them in the new pose.
Creating Different Outfits with Edit
Edit also excels at outfit changes. You can swap clothing, add armor, change colors, or give your character entirely new gear, all while maintaining their face, body type, and distinguishing features.
How to change outfits:
Click "Edit" on your character
Describe the new outfit: "wearing heavy combat armor with glowing accents"
Generate to see your character in the new look
Example: Outfit variations

Casual outfit
"wearing a hoodie and cargo pants"
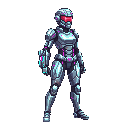
Combat armor
"wearing full chrome battle armour"
Tip: Be specific about materials and colors. Instead of "armor," try "sleek black polymer armor with cyan LED strips."
Creating New Characters with Reference
Reference is different from Edit. Instead of modifying the image, Reference uses it as a style guide. This is perfect for creating NPCs, companions, or enemies that match your protagonist's art style.
The AI analyzes your reference image's pixel density, color palette, shading style, and proportions, then applies those characteristics to whatever you describe.
How to create a new character:
Click the highlighted "Ref" button
Click "Ref" (Use as Reference) on your character
Describe a completely different character: "male hacker with cybernetic eye implant"
Generate to create a new character in the same art style
Example: New character from reference
Reference
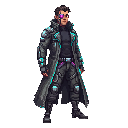
New character
"Male hacker with cybernetic eye implant, wearing a long coat" - created using the protagonist as reference
Tip: Your theme still applies when using Reference. Keep the same theme active to ensure maximum consistency across your character roster.
Edit vs Reference: Quick Comparison
Edit
Modifies your existing image. The character stays the same but changes pose, outfit, expression, or details.
Best for:
- Different poses of the same character
- Outfit and equipment changes
- Color and detail adjustments
Reference
Creates something new using your image as a style guide. Completely different subject, same art style.
Best for:
- New characters that match your style
- Enemies, NPCs, and companions
- Building a cohesive cast
Pro Tips
Chain your workflow: Create a base character, Edit for poses, then use each pose as Reference for other characters in that pose.
Keep settings consistent: Use the same pixel resolution and theme across all generations for maximum cohesion.
Build a reference library: Save your best results. A strong reference image makes all future generations more consistent.
Iterate quickly: If an edit doesn't preserve a feature, mention it explicitly in your prompt and regenerate.
Ready to expand your roster?
Jump into the app and start creating character variations, poses, and new cast members.