How to generate game UI with AI, from concept to components
Generate the whole screen as concept art first, then pull the buttons, panels and bars out of it as real game UI components. Plus how to hand the result to a coding agent.
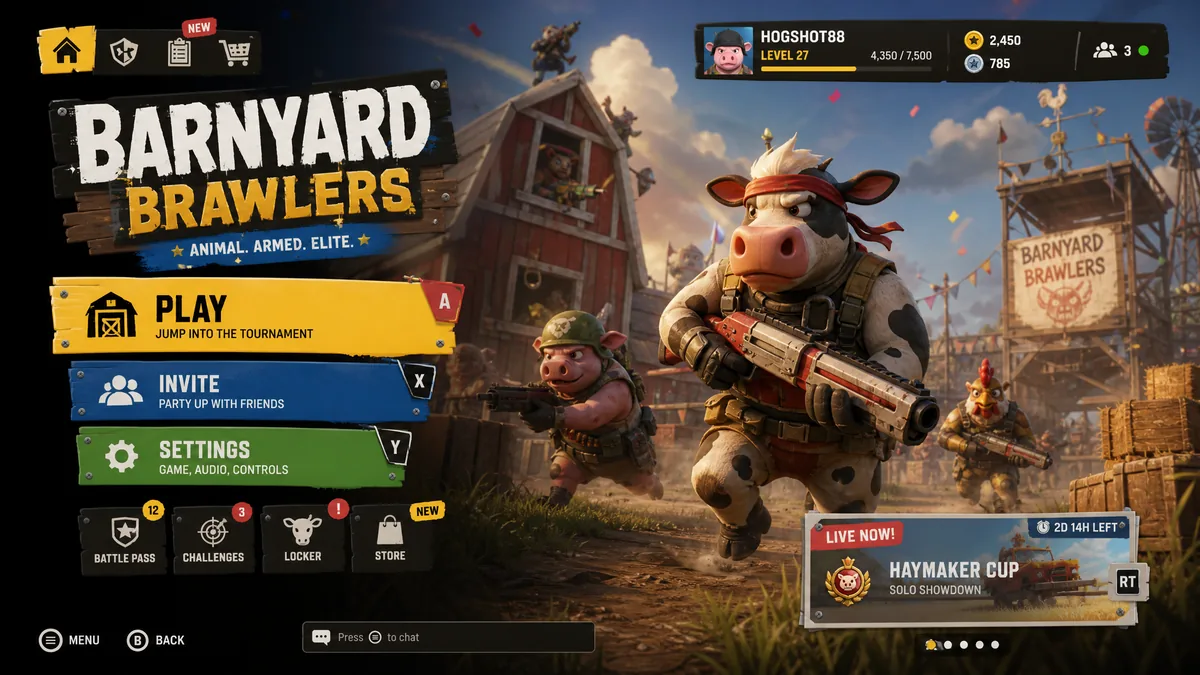
UI is the part of the art that never fits. You can grab a character pack or a tileset off the shelf and get away with it. Your main menu is different. It has your buttons, your currencies, your one weird tab bar, and the layout only makes sense for your game.
So people try generating the pieces one at a time. Generate a button. Generate a panel. Generate a health bar. What you get back is three elements from three different games. Different lighting, different border thickness, different corner radius, different idea of what "chunky" means.
The fix is to go the other way around. Generate the entire screen as one image first, then take it apart.
Step 1: generate the whole screen first
Describe the screen the way you'd describe it to an artist. What the game is, what style you want, and roughly what goes where.

Main menu for a co-op multiplayer game called Barnyard Brawlers.
Cartoon farm setting, painted wooden signs, chunky colored buttons with bolts.
Play, Invite and Settings stacked down the left, player profile bar top right,
row of tab icons bottom left, live event card bottom right.
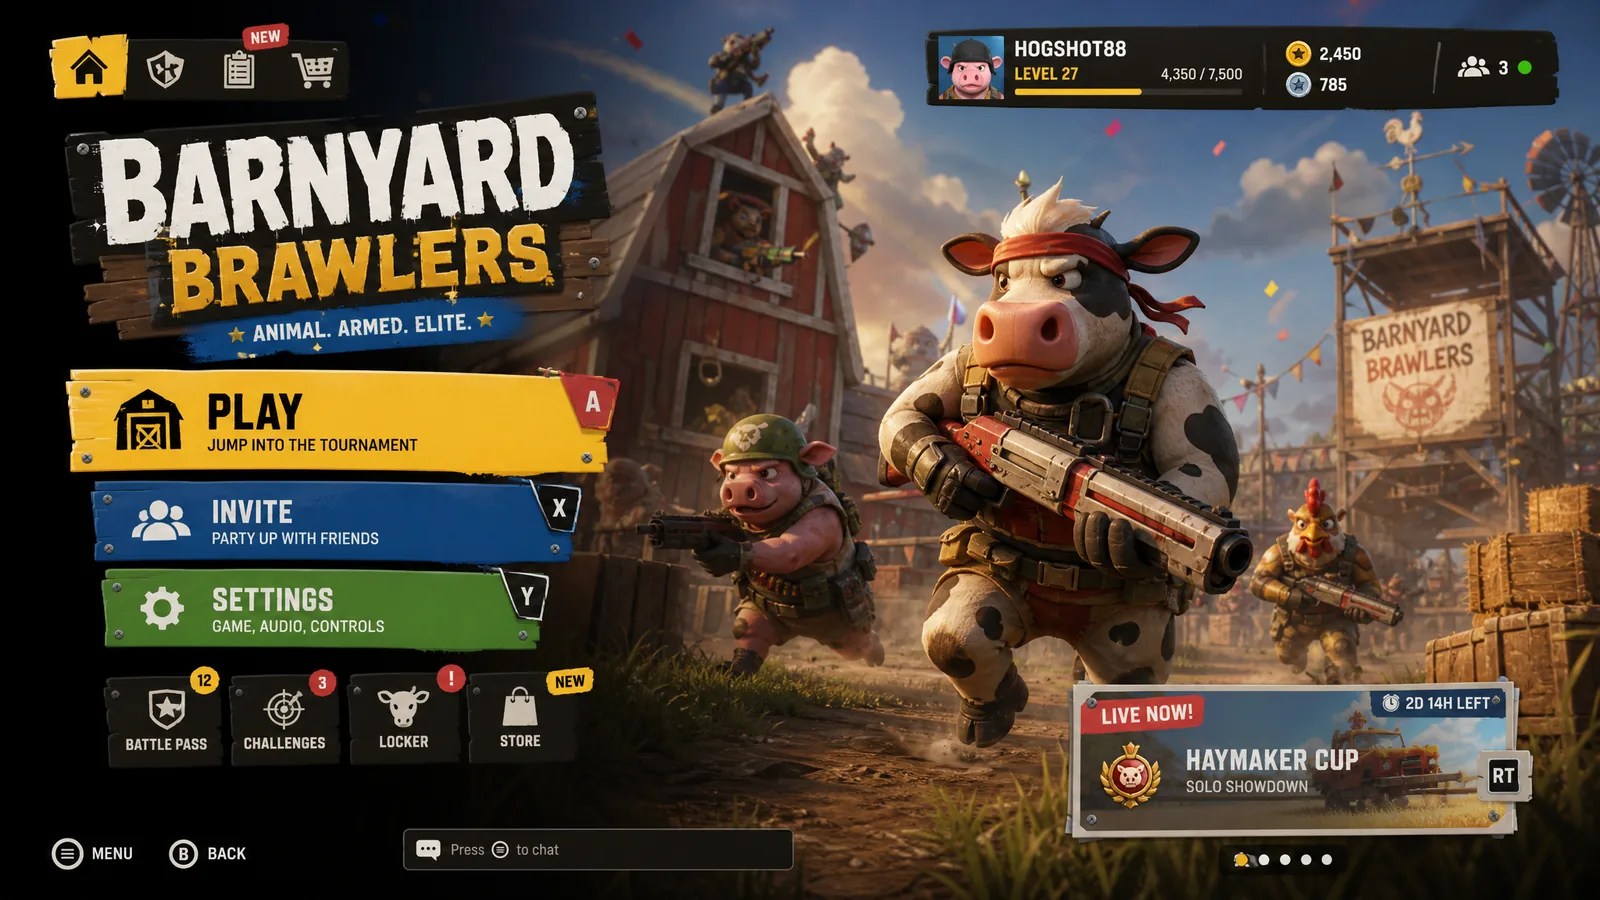
Every element in that image has to agree with every other element, because the model is drawing them in one pass. That agreement is the thing you can't get by generating parts separately, and it's the whole reason this works.
Ignore the text. Models still write nonsense on buttons about half the time, and you're rendering real strings over these in your engine anyway. Look at the shapes, the palette, and the layout.
Step 2: iterate on the concept while it's still cheap
One image per attempt, so this is the part where you can be picky. I usually spend three or four passes here.
Make the character cards smaller.
Move the event card to the bottom right.
Less brown overall, push the yellow.

Getting this right matters more than anything after it. Everything downstream is derived from this image, so a mediocre concept gives you a mediocre kit.
Step 3: ask for the components, using the concept as the reference
Now the actual trick. Instead of asking for a button, you ask for every piece of that screen, with the concept passed in as the reference image, laid out on a transparent background.
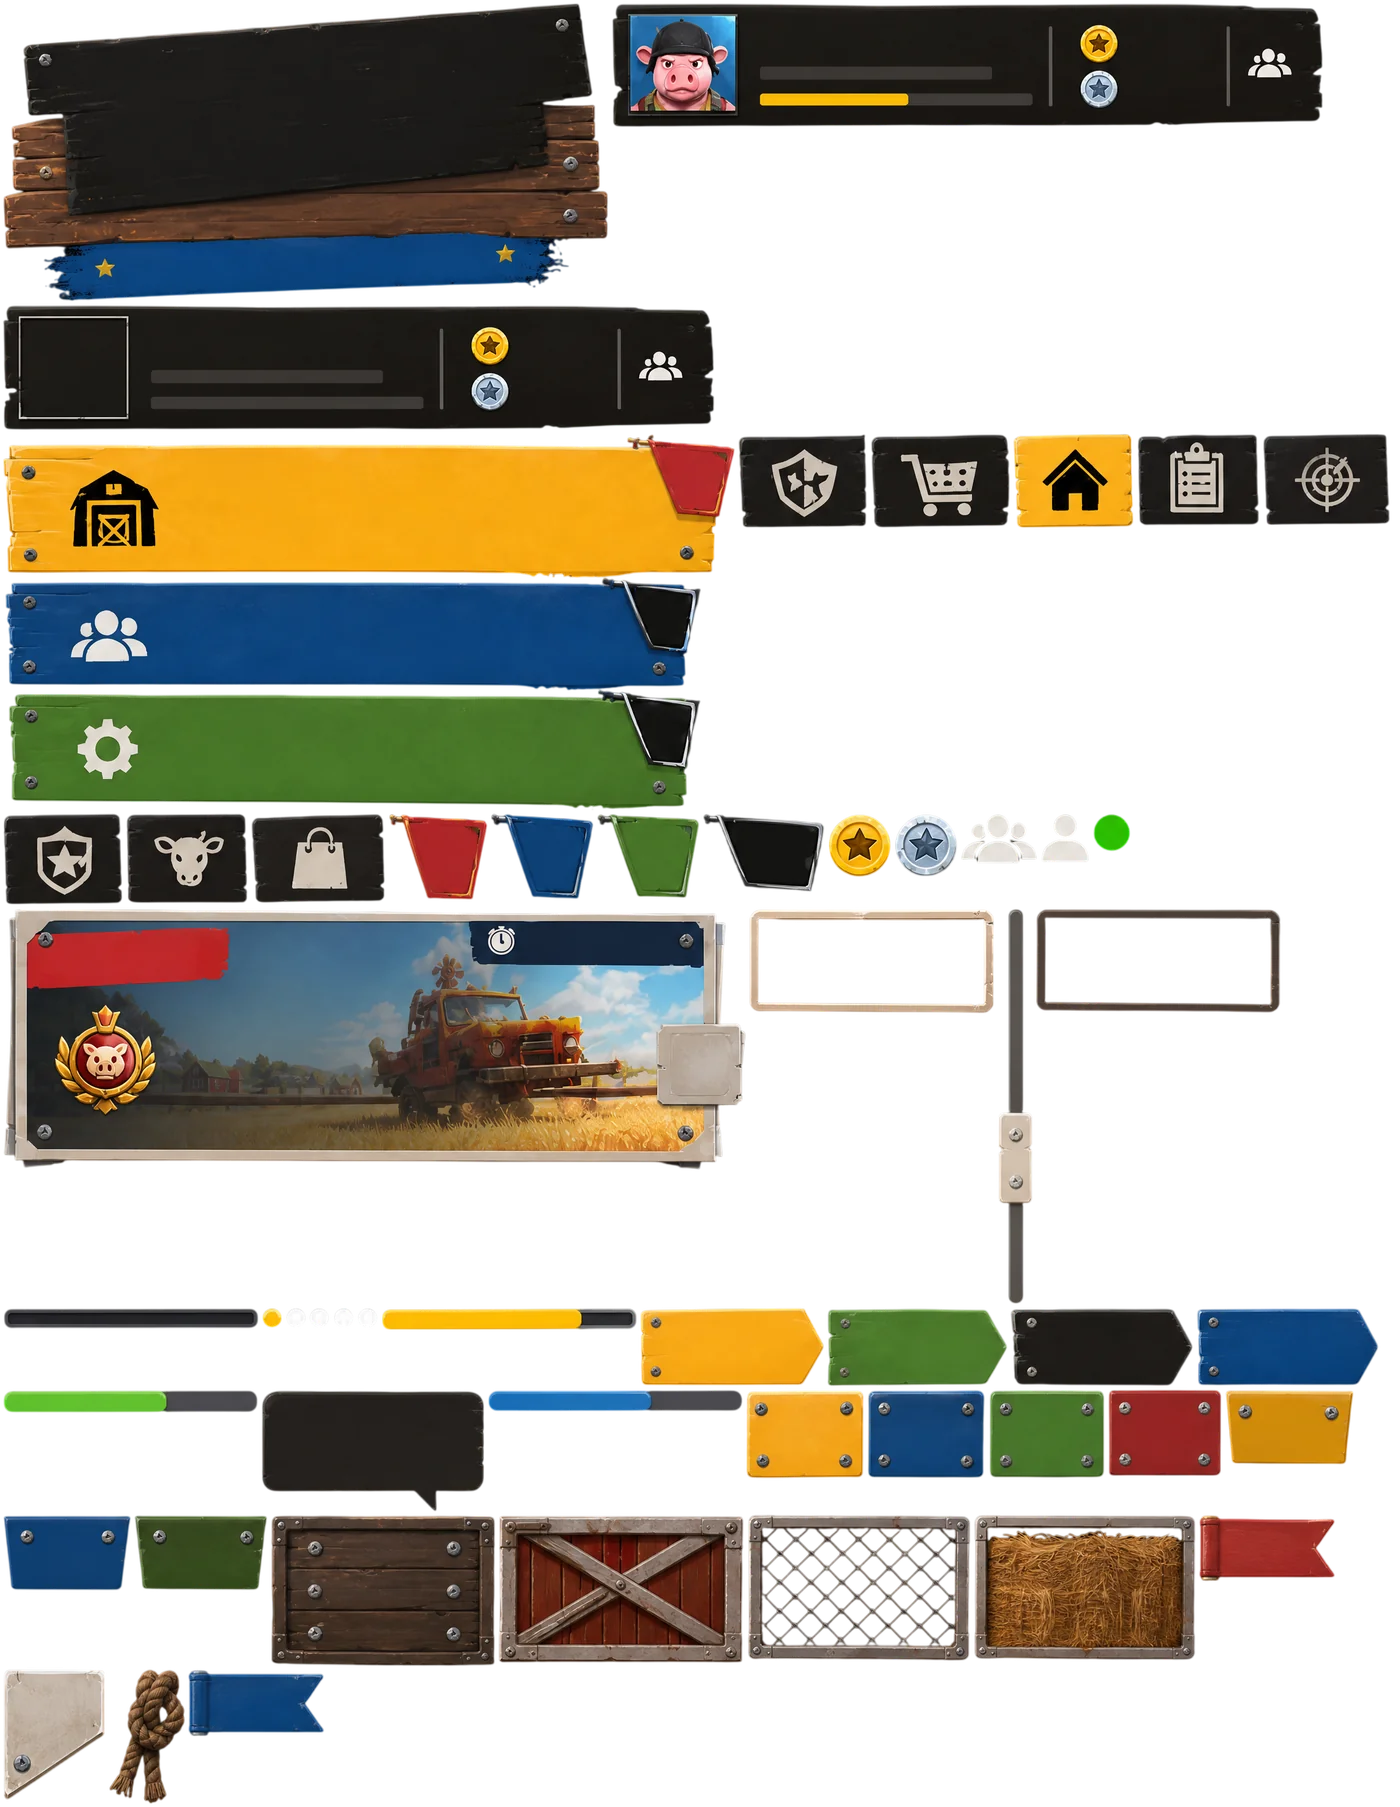
Same wood grain, same bolts, same palette, same lighting angle. They match because they were all traced back to one picture.
This is also where you get the pieces the concept only implied. The concept shows one tab selected, so you ask for the unselected version too. It shows a full progress bar, so you ask for the empty track.
Step 4: when it misses something, ask for that specifically
It will miss things. It merges the tab row into one strip, forgets the pressed state, gives you four buttons when the menu has five. This used to be the point where I'd start over.
You don't have to. Ask again, scoped to what's missing.
Only the buttons this time, one per color, plus a pressed state for each.

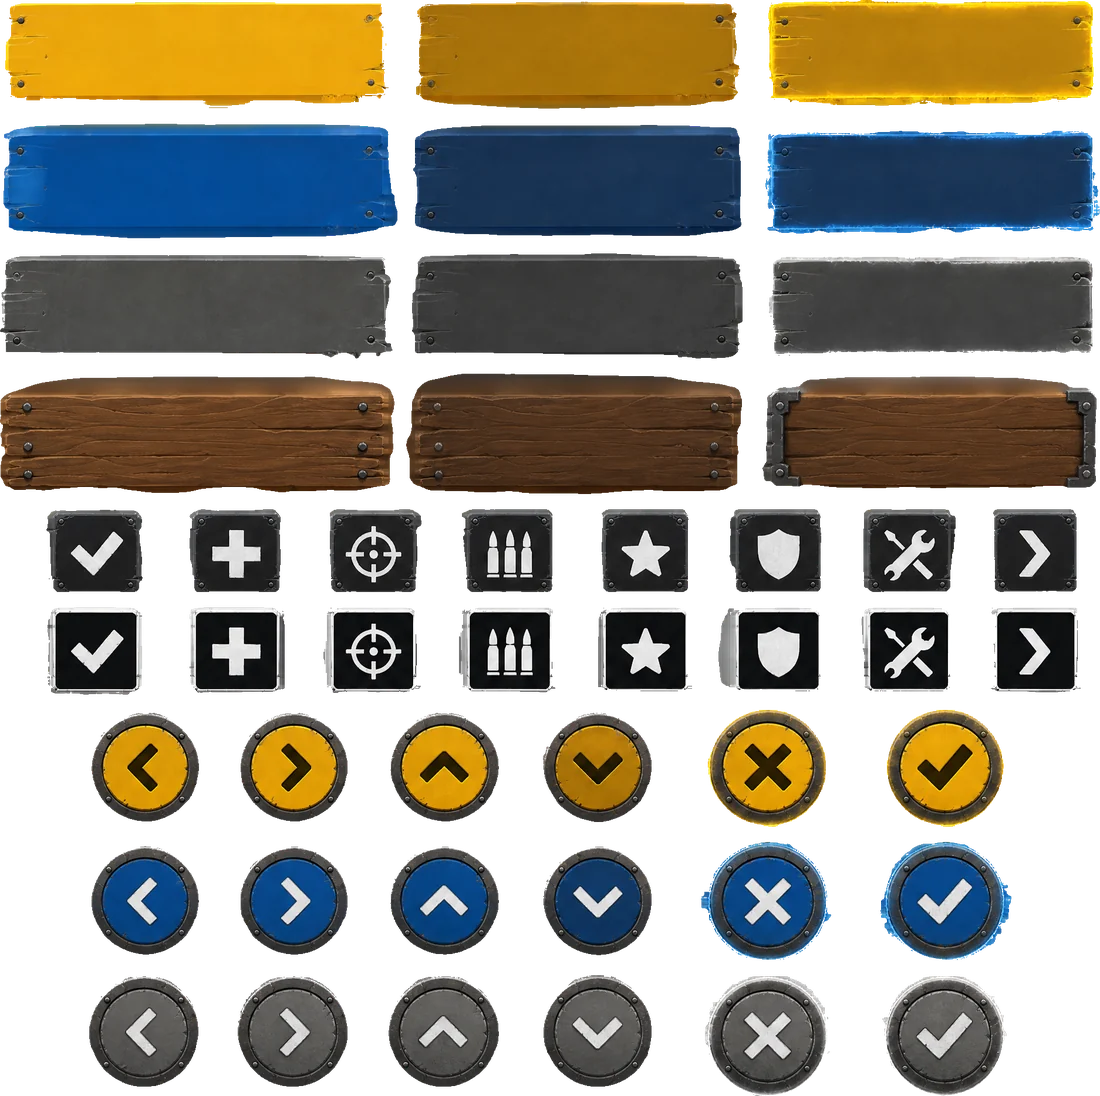
Because the concept is still the reference, the second batch matches the first batch. You can keep doing this until the kit is complete, and you're only paying for the pieces you're missing.
Step 5: cut them up and mark the stretch borders
Split the sheet into individual transparent PNGs, then mark nine-slice borders on anything that has to resize.
Nine-slice is worth thirty seconds if it's new to you. Your Play button has to fit the word "Play" and also the words "Continue where you left off". If you scale the whole image, the bolts smear and the corners go oval. Nine-slice marks the corners as fixed, the edges as stretchable in one direction, and the middle as stretchable in both, so the button grows without warping the detail.
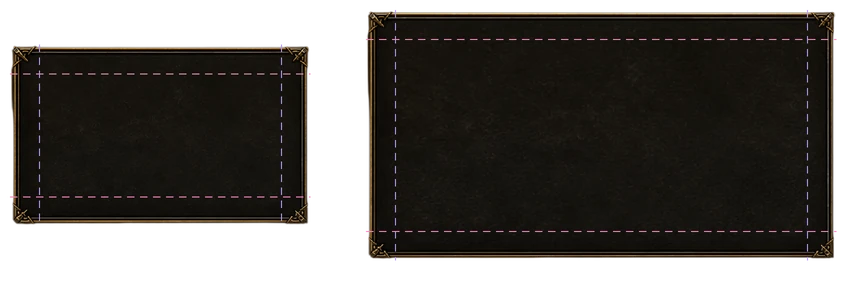
Do it once per element and every engine will respect it.
Step 6: hand the whole thing to your coding agent
This is the part that changed how I build UI, and it only works because of everything above.
Export gives you a folder like this:
concept.png        the screen you designed
elements/          every piece as a transparent PNG
manifest.json      each piece with its nine-slice borders and state groups
ui-kit.png         packed atlas
ui-kit.json        where each piece sits in the atlas
load-ui-kit.js     loader snippet
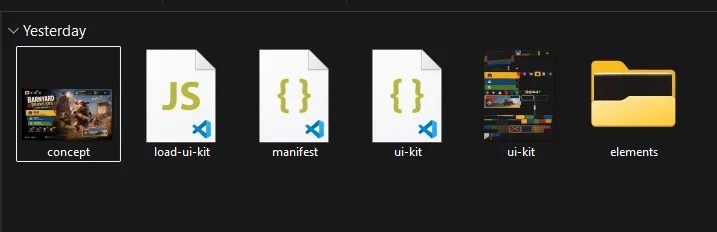
Then you point an agent at it:
Build the main menu for this game.

- concept.png is the target design. Match this layout.
- elements/ has every piece as a transparent PNG.
- manifest.json lists each piece with its nine-slice borders and state groups.

Use the elements as they are, don't draw shapes in code and don't
invent placeholder rectangles. Stretch panels and buttons using the
nine-slice borders from the manifest. Wire up hover and pressed
states wherever the manifest has a state group.

Make it responsive: anchor the profile bar to the top right, keep the
button column left-aligned, and hold up at 16:9 and ultrawide without
distorting the art.
The concept image is doing double duty here. For you it was a design you approved, and for the agent it's a layout spec it can actually look at. Coding agents are good at "make it look like this picture, using these files", and this is the rare case where you have both.
If your agent is connected to SpriteCook over MCP, it can pull the finished assets itself and generate missing pieces against the same concept, without you moving files around.
Why this works when generic asset workflows don't
Three things, and they're all downstream of the same decision.
- You make one design call instead of forty. Judging a whole screen is easy. Judging whether a button matches a panel you generated an hour ago is hard, and that's where kits usually fall apart.
- The reference never moves. Every batch of components points back to the same concept, so batch five looks like batch one.
- The design and the spec are the same file. You approved the concept, so the agent implementing it has your approval baked in.
That last one is what solves the "UI is too specific for any general workflow" problem. Your menu is unique, which is exactly why a generic pipeline can't help you, but a concept you generated in two minutes describes it completely.
Things I got wrong first
- Don't slice the concept image itself. The elements overlap, they sit on a painted background, and you end up with a button that has a piece of a cow in the corner. Regenerate the pieces on transparent, don't crop them.
- Generate the concept at high resolution. You're harvesting detail out of it later. A small concept gives you mushy components.
- One concept per screen. The main menu and the in-game HUD are different layouts. Reuse the style description, generate a separate concept for each, and reference the first one so they stay in the same family.
- Don't fight the fake text. Rewriting a prompt six times to get the word "Settings" spelled right is time you'll never get back. Your engine draws the text.
Where to start
Pick one screen you already know you need. Main menu is the easiest to judge because you've seen a thousand of them.
- Generate a game UI concept and pull components out of it
- See the full element breakdown from a lobby screen
- Connect SpriteCook to your coding agent so it can generate and implement in one pass
- Slicing sheets into separate assets if you want the manual version
FAQ
Can AI generate game UI assets you can actually use in an engine? Yes, if you generate them as transparent components rather than cropping them out of a mockup. You also need nine-slice borders on anything that stretches, otherwise buttons and panels distort the first time real text goes in them.
How do you keep AI generated UI elements consistent with each other? Generate the entire screen as one concept image first, then use that concept as the reference for every batch of components. Elements generated separately from separate prompts drift in lighting, palette and border weight almost immediately.
What do you do when the AI misses a component? Ask again for just the missing pieces, with the same concept as the reference. Scoped requests like "only the buttons, plus a pressed state for each" come back matching the batch you already have.
Can a coding agent implement the UI from the exported files? That's the point of exporting the concept alongside the components. The agent gets the target layout as an image, the pieces as PNGs, and the nine-slice data as JSON, which is enough for it to build a responsive screen instead of guessing at rectangles.
What is nine-slice and do I need it? Nine-slice splits an image into fixed corners, stretchable edges and a stretchable middle so it can resize without warping. You need it for any button, panel or bar whose size depends on content. Icons and decorations don't need it.