Sprite stacking for fake 3D pixel art cars and props
Turn a top-down car to any angle from one small sheet of flat slices. How sprite stacking works, how to cut the slices from four flat views, and tested Python and Godot code.
Paste it into Claude Code, Codex, Cursor or any coding agent.
# Add sprite stacking to my game

My top-down game needs objects (cars, props, buildings) that can face any angle without a drawing per direction. Add sprite stacking: each object is a row of flat slices, one per pixel of height, drawn on top of each other 1 px apart and all turned by the same angle, so it looks like a 3D model in crisp pixels.

Before you write code, look at my project: the engine and language, how sprites are drawn and sorted today, the game's pixel resolution and scale, and which objects should turn. Fit this into what is there instead of adding a second rendering system. Keep my resolution, camera and sorting. If an object has no slice sheet yet, see "Art it needs" and ask me which option I want before you make art.

## How it works

- A slice sheet is one row of equal slices, the ground slice on the left, the top slice on the right. Every slice is a top-down picture of one layer of the object.
- Draw slice 0 first, then each next slice 1 px higher on screen. Later slices cover earlier ones.
- To turn the object, rotate every slice by the same angle around its center before you lift it. Use nearest neighbor sampling.
- For a camera that looks down at an angle, squash each turned slice vertically by a factor before you lift it. 1 is straight down.
- Sort whole stacks against other objects by the point where they touch the ground, never slice by slice.
- Keep the stack's position on whole pixels.

## Numbers that matter

- Spacing: 1 screen px between slices at the game's pixel scale. A slice index z is lifted by round(z * spacing).
- Squash: 0.75 for a camera a little lower than straight down. Below about 0.6 roofs get thin.
- The reference car is 15 slices of 24 x 43 px. With squash 1 it covers 24 x 52 px on screen; with squash 0.75, 24 x 41 px; turned 90 degrees, 43 px wide.
- In the sheet the object faces down (+y). For an object moving with velocity v, turn = atan2(v.y, v.x) - 90 degrees. When a car reverses, turn it by its heading instead, or it flips round to face backwards.

## Pseudo code

```
# sheet: one row of `count` slices, each w x h px, ground slice first
# pos: where the object's center touches the ground, in whole screen px
function draw_stack(sheet, count, pos, turn, squash = 0.75, spacing = 1.0):
    w = sheet.width / count
    h = sheet.height
    rect = (-floor(w / 2), -floor(h / 2), w, h)          # slice drawn around its center
    for z in 0 .. count - 1:
        transform = translate(pos)
                  * translate(0, -round(z * spacing))     # lift
                  * scale(1, squash)                      # camera height
                  * rotate(turn)                          # same turn for every slice
        draw_region(sheet, source = (z * w, 0, w, h), dest = rect, transform, filter = NEAREST)

# every frame, for each turning object:
turn = atan2(velocity.y, velocity.x) - PI / 2
draw objects sorted by pos.y (ground point), each with draw_stack
```

Godot: in a Node2D's `_draw()`, `draw_set_transform_matrix(lift * spin)` then `draw_texture_rect_region(sheet, rect, Rect2(z * w, 0, w, h))`, where `lift = Transform2D(Vector2(1, 0), Vector2(0, squash), Vector2(0, -round(z * spacing)))` and `spin = Transform2D(turn, Vector2.ZERO)`; set the default texture filter to Nearest. Unity: one child SpriteRenderer per slice with increasing sorting order, or draw the slices into a render texture. Custom engine: a rotated, vertically scaled blit per slice.

## Pitfalls

- Jitter while turning slowly: nearest neighbor rotation moves pixels in jumps. Draw the object at a larger pixel scale. RotSprite sampling (scale up 8x with Scale2x, rotate, take the center pixel of each 8 x 8 block) steadies long edges but rounds off small sprites, so compare both.
- Soft art (soft edges, in-between shades, thin stripes) smears once slices overlap and turn. A bold outline and flat fills stay crisp.
- An outline drawn around every slice draws lines through the object, and so does an outline baked into the slice sheet: it shows as dark speckle inside the body on diagonals. Outline the finished stack once, for example by drawing it into an offscreen buffer first.
- Slices cut from flat views cannot have holes or overhangs; fix those slices by hand.
- Many static stacks (trees, rocks) cost one draw per slice each. Draw a stack that never turns once at load time and use the result as a plain sprite.
- Fractional positions blur or shimmer the slices. Round the stack's position to whole pixels.

## Check that it works

- With squash 1 and turn 0, the drawn object is as wide as one slice and as tall as the slice height plus (count - 1) px, give or take slices that are shorter than the ground slice.
- With squash 0.75 it is shorter than with squash 1; turned 90 degrees its width equals the slice height.
- Spacing 2 makes it taller than spacing 1.
- Draw it straight down (squash 1, turn 0) and compare with pasting the slices by hand, each 1 px above the last: every pixel should match. Write this as a small automated test if the engine allows reading back a frame; otherwise add a debug key that cycles turn, squash and spacing.
- Driving in a circle, the object's front always points where it moves.
- Set spacing to 0 and squash to 1, and the object draws flat: every slice in the same place, the top slice over the rest.

## Art it needs

Each object needs a slice sheet. Cheapest first:

1. If I already have the object in a voxel editor such as MagicaVoxel, export its layers as a slice sheet.
2. Cut slices from four flat views (top, side, front, back): a pixel exists where all views have one; each row of the side view becomes one slice, the top view cut to the length and width the side and front views have at that height. The top of each column takes the top view's color, the 2 px edge of each slice the color of the view on that side. The full guide below has a tested Python script for this.
3. If the SpriteCook MCP tools are available in this session, generate the four views as one sheet with Nano Banana Pro (`gemini-3-pro-image`), pixel art, size 32 x 32, using a prompt that asks for a strictly orthographic 2x2 sheet (top view pointing down, side view pointing left, front, back), the same scale in every view, a bold 1 px dark outline and flat color fills. Check the sheet before slicing it: the top view is the tallest drawing, the side view the widest, and the side view must face left.

Full guide with pictures, the slicing script and tested Godot code: https://www.spritecook.ai/blog/sprite-stacking-pixel-art
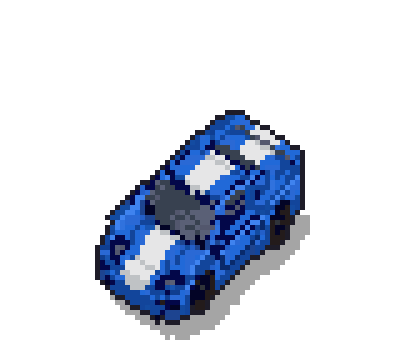
A top-down car sprite only looks right facing one way. Turning it means a drawing for every direction, and even 16 directions look choppy in a racing game. Sprite stacking gets you every angle from one small sheet. You cut the car into flat slices, one per pixel of height, and draw them on top of each other 1 px apart. Turn all the slices by the same angle and the pile turns like a 3D model, in crisp pixels.
One car, 15 slices of 24 x 43 px, drawn at 10x. The car's four views, the asphalt and the grass are SpriteCook generations. The slicing and the stacking are the code on this page.
How it works
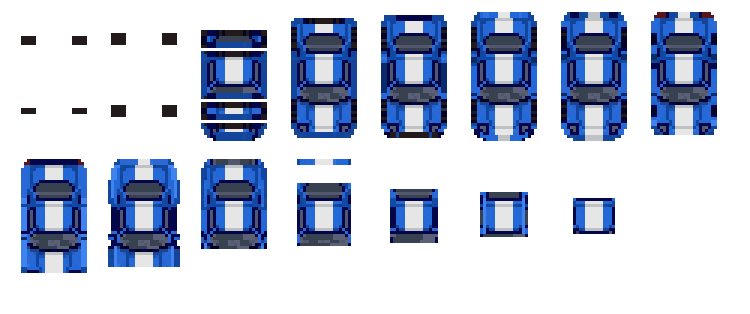
Each slice is a top-down picture of one layer of the car: the bottoms of the wheels, then the body, the windows, the roof. Draw the ground slice first and every next slice 1 px higher. Pulled apart you can see the layers. At 1 px apart they read as one solid car.
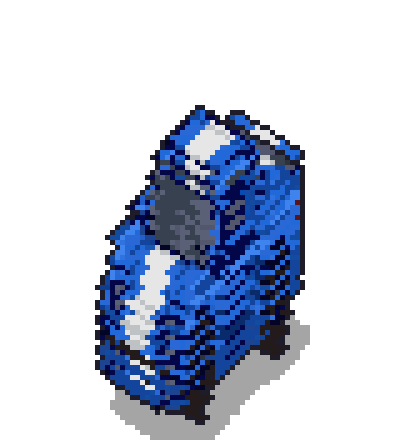
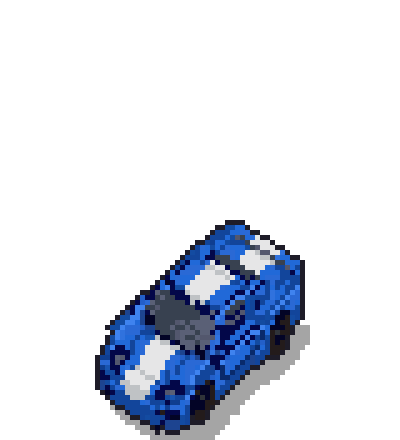
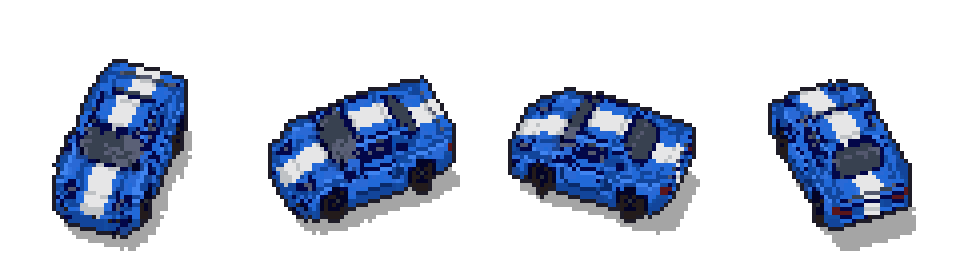
To turn the car, rotate every slice by the same angle around its center, then lift it. Nothing else changes, so one sheet covers every angle.
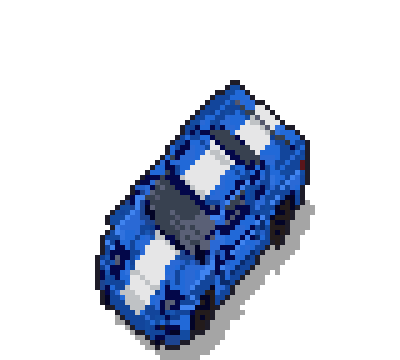
For a camera that looks down at an angle, squash every slice to 75% of its height before you lift it. You see more of the sides and less of the roof. The clip uses 0.75.
Slices from four flat views
Drawing 15 slices by hand is the slow part. The usual route is to build the object in a voxel editor like MagicaVoxel and export its layers. For simple, boxy objects there's a quicker one: four flat views, from the top, the side, the front and the back.
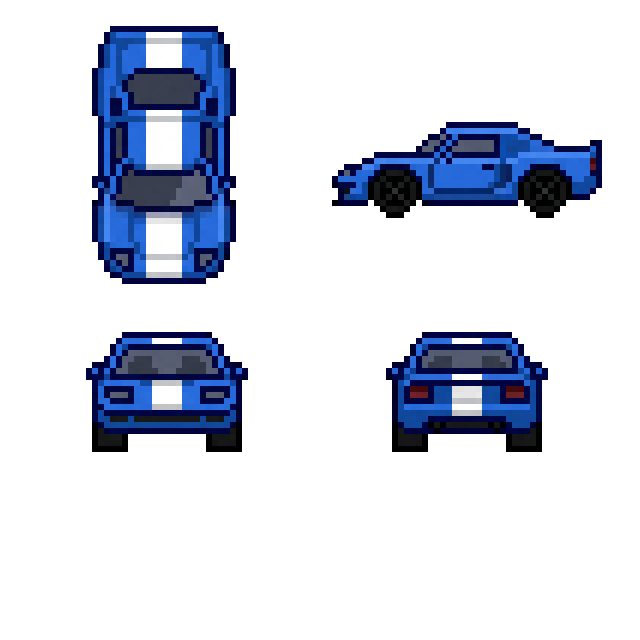
A pixel of the car exists where all the views agree. The top view says where the car is seen from above. The side view says how tall it is along its length, and the front and back views say how wide it is at each height. So every row of the side view becomes one slice: the top view, cut to the length and width the other views have at that height.
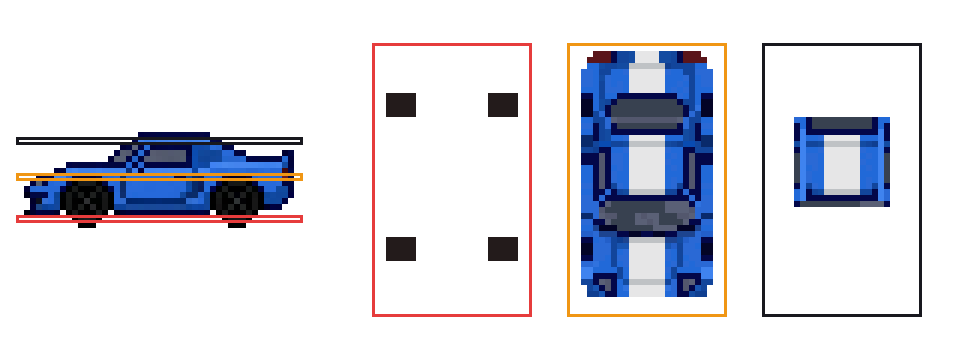
Colors come from the view that faces each pixel. The top of every column takes the top view's color. The 2 px edge of each slice takes the color of the side, front or back view on that side, from the same row.
Generate the views with SpriteCook
The car in this post is one generation with Nano Banana Pro in pixel art mode, size 32 x 32, 16 credits. This prompt asks for the layout the slicing code expects:
Orthographic model sheet of one small blue 90s sports race car with a white center stripe, low and wide, dark windows, black tires, four views in a 2x2 grid. Top-left: TOP view looking straight down at the roof, car pointing DOWN. Top-right: SIDE view, car pointing LEFT. Bottom-left: FRONT view. Bottom-right: BACK view. Strictly orthographic, no perspective, no tilt, no three-quarter angle. Same scale in every view so length, width and height match between views. Crisp clean pixel art with a 1 px dark outline around each view, solid flat color fills, simple shading, no soft edges, no shadows, no ground, no text, no labels, no grid lines, generous empty space between views. Low-resolution chunky pixel art, each view about 32 pixels.
Open SpriteCook with Nano Banana Pro and pixel art on, paste the prompt and set the size to 32. Swap the car for a truck, a tank or a chest; keep the layout sentences as they are.
Look at the sheet before you slice it. The script takes the tallest drawing as the top view and the widest as the side view, and turns the top view so its windows sit over the tall part of the side view. The side view has to face left; if it faces right, pass --side-nose right. Our first try asked for flat colors and no outlines and came out with soft gray edges, which smeared once the slices turned. A bold 1 px outline and flat fills, like the prompt above asks for, stay crisp.
The code
Slices from four views (Python)
views_to_slices.py finds the four drawings on the sheet, removes their outlines, puts them on one shared palette and cuts the slices. It needs Pillow and numpy.
"""Turn four flat views of an object (top, side, front, back) into sprite stacking slices.

  python views_to_slices.py car_views.png car_slices.png --shade 0.25

The sheet holds four drawings: the top view (the tallest), the side view (the widest), then the front and back in
reading order. The side view should face left (--side-nose right if it doesn't); the top view is turned to match it,
so its windows sit over the tallest part of the side view (or set --top-nose up or down yourself).
Writes one row of slices, the ground slice on the left, all the size of the top view.
"""
import argparse

import numpy as np
from PIL import Image


def find_views(sheet):
    """the drawings on the sheet, biggest first four, in reading order (rows, then left to right)"""
    solid = sheet[..., 3] >= 128
    grown = solid.copy()
    for _ in range(2):                                   # pixels 2 apart still count as one drawing
        g = grown.copy()
        g[1:] |= grown[:-1]; g[:-1] |= grown[1:]; g[:, 1:] |= grown[:, :-1]; g[:, :-1] |= grown[:, 1:]
        grown = g
    seen = np.zeros(solid.shape, bool)
    boxes = []
    for y0, x0 in zip(*np.nonzero(grown)):
        if seen[y0, x0]:
            continue
        stack, ys, xs = [(y0, x0)], [], []
        seen[y0, x0] = True
        while stack:
            y, x = stack.pop()
            ys.append(y); xs.append(x)
            for yy, xx in ((y + 1, x), (y - 1, x), (y, x + 1), (y, x - 1)):
                if 0 <= yy < solid.shape[0] and 0 <= xx < solid.shape[1] and grown[yy, xx] and not seen[yy, xx]:
                    seen[yy, xx] = True
                    stack.append((yy, xx))
        if len(ys) > 40:
            boxes.append((min(xs), min(ys), max(xs) + 1, max(ys) + 1))
    big = max((b[2] - b[0]) * (b[3] - b[1]) for b in boxes)
    boxes = [b for b in boxes if (b[2] - b[0]) * (b[3] - b[1]) >= 0.2 * big]      # drop labels and specks
    boxes.sort(key=lambda b: (round((b[1] + b[3]) / 2 / (sheet.shape[0] / 2.2)), b[0]))
    assert len(boxes) == 4, f"found {len(boxes)} drawings, expected top, side, front and back"
    views = []
    for x0, y0, x1, y1 in boxes:
        v = sheet[y0:y1, x0:x1].copy()
        ys, xs = np.nonzero(v[..., 3] >= 128)
        v = v[ys.min():ys.max() + 1, xs.min():xs.max() + 1]
        v[..., 3] = np.where(v[..., 3] >= 128, 255, 0)
        views.append(v)
    # the top view is the tallest drawing, the side view the widest; front and back keep reading order
    top = max(views, key=lambda v: v.shape[0] / v.shape[1])
    side = max((v for v in views if v is not top), key=lambda v: v.shape[1] / v.shape[0])
    return [top, side] + [v for v in views if v is not top and v is not side]


def strip_outline(v, dark=70):
    """a dark pixel on the edge of a drawing is its outline: give it the colour of the pixel inside it"""
    m = v[..., 3] > 0
    pad = np.pad(m, 1)
    edge = m & ~(pad[:-2, 1:-1] & pad[2:, 1:-1] & pad[1:-1, :-2] & pad[1:-1, 2:])
    line = edge & (v[..., :3].astype(int).sum(-1) / 3 < dark)
    out = v.copy()
    for y, x in zip(*np.nonzero(line)):
        for dy, dx in ((1, 0), (-1, 0), (0, 1), (0, -1), (1, 1), (1, -1), (-1, 1), (-1, -1)):
            yy, xx = y + dy, x + dx
            if 0 <= yy < m.shape[0] and 0 <= xx < m.shape[1] and m[yy, xx] and not line[yy, xx]:
                out[y, x] = v[yy, xx]
                break
    return out


def one_palette(views, n):
    """map every view onto one shared palette of n colours, no dithering"""
    px = np.concatenate([v[v[..., 3] > 0][:, :3] for v in views])
    px = np.unique(px // 6 * 6 + 3, axis=0).astype(np.uint8)
    pal = Image.fromarray(px.reshape(1, -1, 3), "RGB").quantize(n, method=Image.MEDIANCUT, dither=Image.NONE)
    pal = np.array(pal.getpalette()[:n * 3]).reshape(-1, 3)
    out = []
    for v in views:
        q = v.copy()
        q[..., :3] = pal[((v[..., None, :3].astype(int) - pal[None, None]) ** 2).sum(-1).argmin(-1)]
        out.append(q)
    return out


def fit(v, w, h):
    return np.array(Image.fromarray(v).resize((w, h), Image.NEAREST))


def edge_colour(view, row, i):
    """a side view's colour at (row, i), pulled inside that row's drawn span"""
    xs = np.nonzero(view[row, :, 3])[0]
    return None if len(xs) == 0 else view[row, min(max(i, xs[0]), xs[-1]), :3]


def carve(top, side, front, back, shade=0.0):
    """top: (L, W). side: (H, L), column = y. front, back: (H, W). Row 0 of a side view is the top of the object.
    shade: how much darker the sides are than the tops, most at the ground (0 = no shading).
    Returns slices [z, y, x, rgba], z = 0 on the ground."""
    L, W = top.shape[:2]
    H = side.shape[0]
    occ = np.zeros((H, L, W), bool)
    for z in range(H):
        r = H - 1 - z
        along = side[r, :, 3] > 0                                    # over y
        across = (front[r, :, 3] > 0) | (back[r, :, 3] > 0)          # over x
        occ[z] = (top[..., 3] > 0) & along[:, None] & across[None, :]
    vol = np.zeros((H, L, W, 4), np.uint8)
    covered = np.zeros((L, W), bool)                                 # something higher in this column
    for z in range(H - 1, -1, -1):
        r = H - 1 - z
        above = covered.copy()
        covered |= occ[z]
        # distance from each cell to the open air, going -x, +x, -y, +y: the nearest one is the face it shows
        o = occ[z]
        ix = np.arange(W)[None, :].repeat(L, 0)
        iy = np.arange(L)[:, None].repeat(W, 1)
        d = np.stack([
            ix - np.maximum.accumulate(np.where(~o, ix, -1), axis=1),
            np.minimum.accumulate(np.where(~o, ix, W)[:, ::-1], axis=1)[:, ::-1] - ix,
            iy - np.maximum.accumulate(np.where(~o, iy, -1), axis=0),
            np.minimum.accumulate(np.where(~o, iy, L)[::-1], axis=0)[::-1] - iy,
        ])
        face, depth = d.argmin(0), d.min(0)
        for y, x in zip(*np.nonzero(o)):
            if not above[y, x]:
                c = top[y, x, :3]                                    # seen from above
            elif depth[y, x] > 2:                                    # under a higher part: carry its colour down,
                c = vol[z + 1, y, x, :3]                             # it shows as the face below that part's edge
            else:
                f = face[y, x]
                c = (edge_colour(side, r, y) if f < 2 else edge_colour(back, r, x) if f == 2
                     else edge_colour(front, r, x))
                if c is None:
                    c = top[y, x, :3]
            if above[y, x] and depth[y, x] <= 2 and shade:           # a side face: darker, more so near the ground
                c = (np.asarray(c, float) * (1 - shade * (1 - z / max(H - 1, 1)) - shade * 0.4)).clip(0, 255)
            vol[z, y, x] = (*np.asarray(c, np.uint8), 255)
    return vol


def match_top(top, side):
    """'down' or 'up': which way round the top view puts its windows over the tall part of the side view"""
    tall = (fit(side, side.shape[1], side.shape[0])[..., 3] > 0).sum(0)
    tall = np.interp(np.linspace(0, len(tall) - 1, top.shape[0]), np.arange(len(tall)), tall) >= 0.8 * tall.max()
    dark = ((top[..., :3].astype(int).sum(-1) < 240) & (top[..., 3] > 0)).mean(1)
    return "down" if (dark * tall).sum() >= (dark[::-1] * tall).sum() else "up"


def views_to_slices(sheet, top_nose="auto", side_nose="left", colours=24, shade=0.0):
    top, side, front, back = one_palette([strip_outline(v) for v in find_views(sheet)], colours)
    if side_nose == "left":
        side = side[:, ::-1]                                         # now column = y, front at the end
    if top_nose == "auto":
        top_nose = match_top(top, side)
    if top_nose == "up":
        top = top[::-1]
    L, W = top.shape[:2]
    H = round(side.shape[0] * L / side.shape[1])                     # height in px at the top view's scale
    return carve(top, fit(side, L, H), fit(front, W, H), fit(back, W, H), shade)


def main():
    p = argparse.ArgumentParser()
    p.add_argument("sheet")
    p.add_argument("out")
    p.add_argument("--top-nose", choices=["auto", "up", "down"], default="auto")
    p.add_argument("--side-nose", choices=["left", "right"], default="left")
    p.add_argument("--colours", type=int, default=24)
    p.add_argument("--shade", type=float, default=0.0, help="darken the sides, 0.25 is a good start")
    a = p.parse_args()
    sheet = np.array(Image.open(a.sheet).convert("RGBA"))
    vol = views_to_slices(sheet, a.top_nose, a.side_nose, a.colours, a.shade)
    Image.fromarray(np.concatenate(list(vol), axis=1)).save(a.out)
    print(f"{len(vol)} slices of {vol.shape[2]} x {vol.shape[1]} px -> {a.out}")


if __name__ == "__main__":
    main()
python views_to_slices.py car_views.png car_slices.png
The output is one row of slices, the ground slice on the left, each the size of the top view.
Drawing the stack in Godot
extends Node2D
## Sprite stacking: draws a row of flat slices on top of each other so they look like one 3D object.
## The sheet is one row of slices, the ground slice on the left. Keep the node on whole pixels.

@export var sheet: Texture2D
@export var slices := 15                    ## how many slices the sheet holds
@export var turn := 0.0                     ## radians; 0 draws the slices as they are in the sheet
@export_range(0.1, 1.0) var squash := 0.75  ## 1 looks straight down; lower is a lower camera
@export var spacing := 1.0                  ## screen px between one slice and the next


func _process(_delta: float) -> void:
	queue_redraw()


func _draw() -> void:
	if sheet == null:
		return
	var w := float(sheet.get_width()) / slices
	var h := float(sheet.get_height())
	var rect := Rect2(-floorf(w / 2.0), -floorf(h / 2.0), w, h)
	var spin := Transform2D(turn, Vector2.ZERO)
	for z in slices:
		# turn the slice on the ground, flatten it for the camera, then lift it z slices up
		var lift := Transform2D(Vector2(1, 0), Vector2(0, squash), Vector2(0, -roundf(z * spacing)))
		draw_set_transform_matrix(lift * spin)
		draw_texture_rect_region(sheet, rect, Rect2(z * w, 0, w, h))
Load the slice sheet as a Texture2D, put it in sheet, set slices to the number of slices and keep the node on whole pixels. The sheet's car faces down, so for a car moving with velocity, set turn = velocity.angle() - PI / 2. Set the project's default texture filter to Nearest.
Tested in Godot 4.6:
- Drawn in a 200 x 160 window and read back, every pixel matches a numpy version of the same drawing at five settings (straight down, squash 0.75, turned 30 and 90 degrees, 2 px spacing).
- Straight down the car covers 24 x 52 px: the slice width, and the length plus the stack.
- Squash 0.75 brings it to 41 px tall. Turned 90 degrees it is 43 px wide, its length.
- Spacing 2 pulls the slices apart to 50 px tall.
- The Python tool's 15 slices match the slices in the clip pixel for pixel.
Other engines
Not tested here. In Unity, give the car one child SpriteRenderer per slice, raise each by one pixel on screen, rotate the sprites together and keep the sorting order from bottom to top. In Phaser, Pygame or your own engine, draw the slice images in a loop with nearest filtering: rotate each one around its center, scale its height by the squash, and offset it up by its index.
Common pitfalls
Turning looks jittery. Nearest neighbor rotation moves pixels in jumps, and on a small sprite every jump shows. Draw it big; the clip uses 10 screen pixels per art pixel. RotSprite sampling (scale each slice up 8x with Scale2x, rotate, take the center pixel of each 8 x 8 block) steadies long edges, but it rounded off this small car, so the clip uses plain nearest neighbor.
Soft art smears. Soft edges and in-between shades blur once the slices turn and overlap, and thin stripes break up. Use a bold outline, flat fills and stripes a few pixels wide.
Holes fill in. Cutting slices from flat views can't make a hole or an overhang. A truck bed, an arch or a spoiler above the trunk comes out solid. Fix those slices by hand.
Sorting against other objects. Sort whole stacks by the point where they touch the ground. Sorting slices of different objects against each other puts a tree slice inside your car.
An outline around every slice. An outline per slice draws lines through the middle of the car. Outline the finished stack once: draw it into a SubViewport and outline that, or bake the angles you need into a sheet with the outline on.
Hundreds of stacks. Each stack is one draw per slice, which is fine for a few cars. For a forest of stacked trees that never turn, draw each tree once at load time and use that as a plain sprite.
Where to next
- How to set up a pixel art game so it renders pixel perfect, so the stack stays on whole pixels
- Make a top-down tileset that actually tiles, for a track or a map under your stacks
- Let your AI agent generate sprites and animations, to make the views from your coding agent
- MagicaVoxel, a free voxel editor that exports slices for sprite stacking
Add this to your game with your coding agent
The prompt has the numbers, pseudo code, pitfalls and checks from this guide, written so your agent can fit it into your own project.
# Add sprite stacking to my game

My top-down game needs objects (cars, props, buildings) that can face any angle without a drawing per direction. Add sprite stacking: each object is a row of flat slices, one per pixel of height, drawn on top of each other 1 px apart and all turned by the same angle, so it looks like a 3D model in crisp pixels.

Before you write code, look at my project: the engine and language, how sprites are drawn and sorted today, the game's pixel resolution and scale, and which objects should turn. Fit this into what is there instead of adding a second rendering system. Keep my resolution, camera and sorting. If an object has no slice sheet yet, see "Art it needs" and ask me which option I want before you make art.

## How it works

- A slice sheet is one row of equal slices, the ground slice on the left, the top slice on the right. Every slice is a top-down picture of one layer of the object.
- Draw slice 0 first, then each next slice 1 px higher on screen. Later slices cover earlier ones.
- To turn the object, rotate every slice by the same angle around its center before you lift it. Use nearest neighbor sampling.
- For a camera that looks down at an angle, squash each turned slice vertically by a factor before you lift it. 1 is straight down.
- Sort whole stacks against other objects by the point where they touch the ground, never slice by slice.
- Keep the stack's position on whole pixels.

## Numbers that matter

- Spacing: 1 screen px between slices at the game's pixel scale. A slice index z is lifted by round(z * spacing).
- Squash: 0.75 for a camera a little lower than straight down. Below about 0.6 roofs get thin.
- The reference car is 15 slices of 24 x 43 px. With squash 1 it covers 24 x 52 px on screen; with squash 0.75, 24 x 41 px; turned 90 degrees, 43 px wide.
- In the sheet the object faces down (+y). For an object moving with velocity v, turn = atan2(v.y, v.x) - 90 degrees. When a car reverses, turn it by its heading instead, or it flips round to face backwards.

## Pseudo code

```
# sheet: one row of `count` slices, each w x h px, ground slice first
# pos: where the object's center touches the ground, in whole screen px
function draw_stack(sheet, count, pos, turn, squash = 0.75, spacing = 1.0):
    w = sheet.width / count
    h = sheet.height
    rect = (-floor(w / 2), -floor(h / 2), w, h)          # slice drawn around its center
    for z in 0 .. count - 1:
        transform = translate(pos)
                  * translate(0, -round(z * spacing))     # lift
                  * scale(1, squash)                      # camera height
                  * rotate(turn)                          # same turn for every slice
        draw_region(sheet, source = (z * w, 0, w, h), dest = rect, transform, filter = NEAREST)

# every frame, for each turning object:
turn = atan2(velocity.y, velocity.x) - PI / 2
draw objects sorted by pos.y (ground point), each with draw_stack
```

Godot: in a Node2D's `_draw()`, `draw_set_transform_matrix(lift * spin)` then `draw_texture_rect_region(sheet, rect, Rect2(z * w, 0, w, h))`, where `lift = Transform2D(Vector2(1, 0), Vector2(0, squash), Vector2(0, -round(z * spacing)))` and `spin = Transform2D(turn, Vector2.ZERO)`; set the default texture filter to Nearest. Unity: one child SpriteRenderer per slice with increasing sorting order, or draw the slices into a render texture. Custom engine: a rotated, vertically scaled blit per slice.

## Pitfalls

- Jitter while turning slowly: nearest neighbor rotation moves pixels in jumps. Draw the object at a larger pixel scale. RotSprite sampling (scale up 8x with Scale2x, rotate, take the center pixel of each 8 x 8 block) steadies long edges but rounds off small sprites, so compare both.
- Soft art (soft edges, in-between shades, thin stripes) smears once slices overlap and turn. A bold outline and flat fills stay crisp.
- An outline drawn around every slice draws lines through the object, and so does an outline baked into the slice sheet: it shows as dark speckle inside the body on diagonals. Outline the finished stack once, for example by drawing it into an offscreen buffer first.
- Slices cut from flat views cannot have holes or overhangs; fix those slices by hand.
- Many static stacks (trees, rocks) cost one draw per slice each. Draw a stack that never turns once at load time and use the result as a plain sprite.
- Fractional positions blur or shimmer the slices. Round the stack's position to whole pixels.

## Check that it works

- With squash 1 and turn 0, the drawn object is as wide as one slice and as tall as the slice height plus (count - 1) px, give or take slices that are shorter than the ground slice.
- With squash 0.75 it is shorter than with squash 1; turned 90 degrees its width equals the slice height.
- Spacing 2 makes it taller than spacing 1.
- Draw it straight down (squash 1, turn 0) and compare with pasting the slices by hand, each 1 px above the last: every pixel should match. Write this as a small automated test if the engine allows reading back a frame; otherwise add a debug key that cycles turn, squash and spacing.
- Driving in a circle, the object's front always points where it moves.
- Set spacing to 0 and squash to 1, and the object draws flat: every slice in the same place, the top slice over the rest.

## Art it needs

Each object needs a slice sheet. Cheapest first:

1. If I already have the object in a voxel editor such as MagicaVoxel, export its layers as a slice sheet.
2. Cut slices from four flat views (top, side, front, back): a pixel exists where all views have one; each row of the side view becomes one slice, the top view cut to the length and width the side and front views have at that height. The top of each column takes the top view's color, the 2 px edge of each slice the color of the view on that side. The full guide below has a tested Python script for this.
3. If the SpriteCook MCP tools are available in this session, generate the four views as one sheet with Nano Banana Pro (`gemini-3-pro-image`), pixel art, size 32 x 32, using a prompt that asks for a strictly orthographic 2x2 sheet (top view pointing down, side view pointing left, front, back), the same scale in every view, a bold 1 px dark outline and flat color fills. Check the sheet before slicing it: the top view is the tallest drawing, the side view the widest, and the side view must face left.

Full guide with pictures, the slicing script and tested Godot code: https://www.spritecook.ai/blog/sprite-stacking-pixel-art
More game techniques
All techniques
 Eight 2D camera follow techniques, from dead zone to look-aheadA camera that sits on the player works, but it doesn't help them. Eight ways a 2D camera can follow, from smoothing and a dead zone to look-ahead, points of interest and framing two targets, with the numbers, tested Godot code and the Cinemachine setup for Unity.
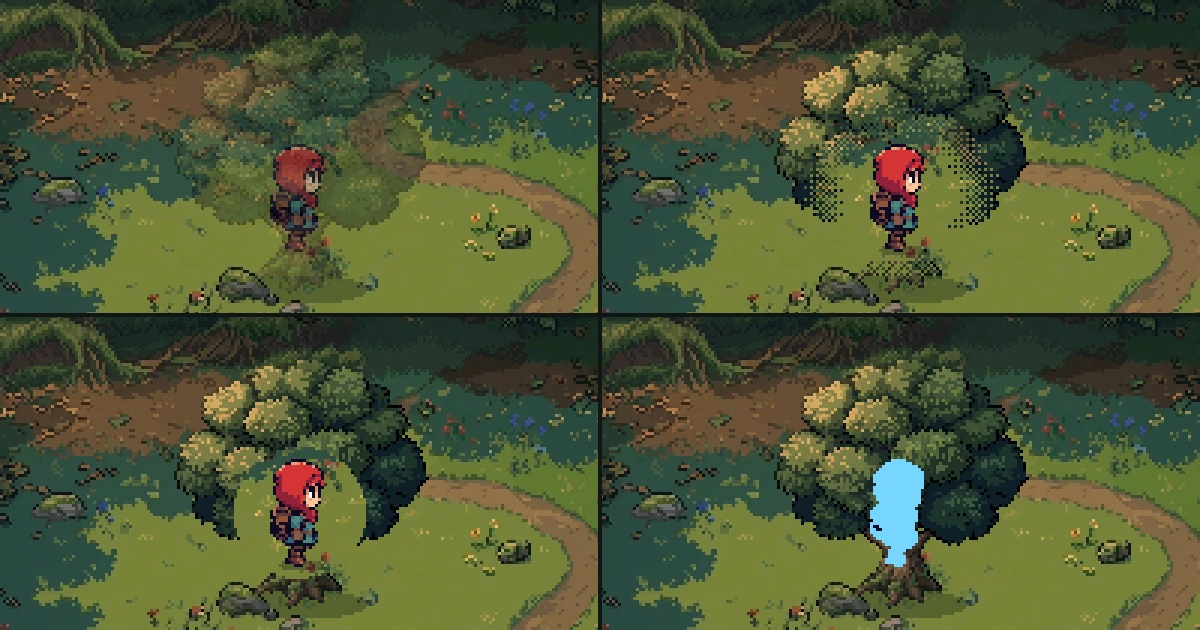 4 ways to keep the player visible behind trees and walls in a 2D gameFade, dither, cutout and silhouette, the four standard ways to show a character who walks behind a tree or a wall. What each one does to pixel art, when to switch it on, the numbers, a tested Godot script with its shader, and the pitfalls.
 Coyote time, jump buffering and corner correction for 2D platformersThree small bits of forgiveness that make a platformer feel fair. A late jump off a ledge, an early jump before landing and a nudge past a corner, with the numbers, tested Godot code and the pitfalls.